Using LED int arrays
LED int arrays are best suited towards graphics which are complex enough that they need to be dotted pixel by pixel. For text, please see Using LEDText for Text. For shapes such as lines, rectangles, and circles, please see Using LEDMatrix for Shapes.
In essence, LED int arrays give the matrix a list of exactly which LEDs you want to light. They are time-consuming to create and take up space; however, they give you complete freedom to customize your matrix however you like.
When setting up your project, create a config.h file and a declarations.h file in the same folder as your sketch .ino file, then add them to the workflow under Sketch > Add File.

To begin using an int array, first make sure you have all of the essential declarations in your main file, as well as your config.h.
config.h:
#ifndef config_h
#define config_h
#include <FastLED.h>
#include <LEDMatrix.h>
#include <Font12x16.h>
#include <Font16x24.h>
#include <FontMatrise.h>
#include <LEDText.h>

#define MATRIX_TILE_WIDTH   8 // width of matrix (not total display)
#define MATRIX_TILE_HEIGHT  32 // height of matrix
#define MATRIX_TILE_TYPE VERTICAL_ZIGZAG_MATRIX
#define MATRIX_BOARD_CHIP WS2812B
#define MATRIX_TILE_H       1  // number of matrices arranged horizontally
#define MATRIX_TILE_V       1  // number of matrices arranged vertically
#define COLOR_ORDER GRB // hardware-dependent
#define LED_PIN 6 // pin where matrices are connected
#define NUM_LEDS MATRIX_TILE_WIDTH * abs(MATRIX_TILE_HEIGHT)

#define BRIGHTNESS 5 // brightness of LEDs
#endif
main:
#include "config.h" // this file includes our libraries and device-specific variables
#include "declarations.h" // this file includes variables for LED patterns

// creating the matrix using LEDMatrix
// note that height and width are flipped in this example due to TILE_TYPE
// for further clarification on this, see the LEDText wiki
cLEDMatrix <MATRIX_TILE_HEIGHT, MATRIX_TILE_WIDTH, MATRIX_TILE_TYPE> ledmatrix;
// creating a pointer to the matrix so FastLED can still operate
CRGB *leds = ledmatrix[0];
// declaring LEDText
cLEDText ScrollingMsg;

void setup() {

  // instantiate FastLED
  FastLED.addLeds<MATRIX_BOARD_CHIP, LED_PIN, COLOR_ORDER>(ledmatrix[0], ledmatrix.Size());
  FastLED.setBrightness(BRIGHTNESS);

  // instantiate LEDText
  ScrollingMsg.SetFont(MatriseFontData);
  ScrollingMsg.Init(&ledmatrix, ledmatrix.Width(), ScrollingMsg.FontHeight() + 1, 0, 0);
}

void loop() {
 // this is where your pattern commands will live soon
}

// Purpose: Draws LEDs by running through the pixels, one by one, and seeing if they should be lit up according to their array
// Accepts: uint16_t[] of your desired pattern, int size of the pattern array, long int hex code
// Returns: nothing
void drawPattern(uint16_t patternArray[], int patternSize, long int colour) {
  // PGM comes into play here. For more info about PGM, see the declarations header or the wiki

  uint16_t nextPixel; // holds current RAM value from PGM
  int pixelCounter = 0; // increments when a pixel is placed
  for (int i = 0; i < NUM_LEDS; i++) { // loop through LED in the matrix
    for (int j = 0; j < patternSize; j++) { // check every element in the pattern array for the current LED
      nextPixel = pgm_read_word(&patternArray[pixelCounter]); // pull element into RAM
      if (i == nextPixel) { // if the pixel in the matrix matches the array element
        leds[i] = colour; // turn the pixel the specified colour
        pixelCounter++; // move to the next pixel
      }
    }
  }
}
Alright, now that your files are set up, let's add some stuff into your declarations.h file.
The first thing we're going to create is the int array itself. Follow me.
const uint16_t arrayName[] PROGMEM = {1, 2, 3...};
Let's break this down:
const: This array is a "constant". It can't be changed during the program.
uint16_t: This array will be filled with unsigned 16-bit integers, ie positive or negative whole numbers.
arrayName: This is the name of your array. Name it something appropriate, so when you go to use it you won't forget what it is. For example, if this animation is of a smile, maybe use smileMouth.
[]: Indicates this is an array of integers rather than just one single integer.
PROGMEM: This array will be stored in ROM instead of RAM. See Notes: PROGMEM for more info on this.
{1, 2, 3}: These are going to be the index numbers of your LEDs. Take a look at the places on your design grid where pixels are lit up, and put those numbers in here.
;: Almost every statement in C/C++ ends in a semicolon. It tells the IDE "hey, this command is done".
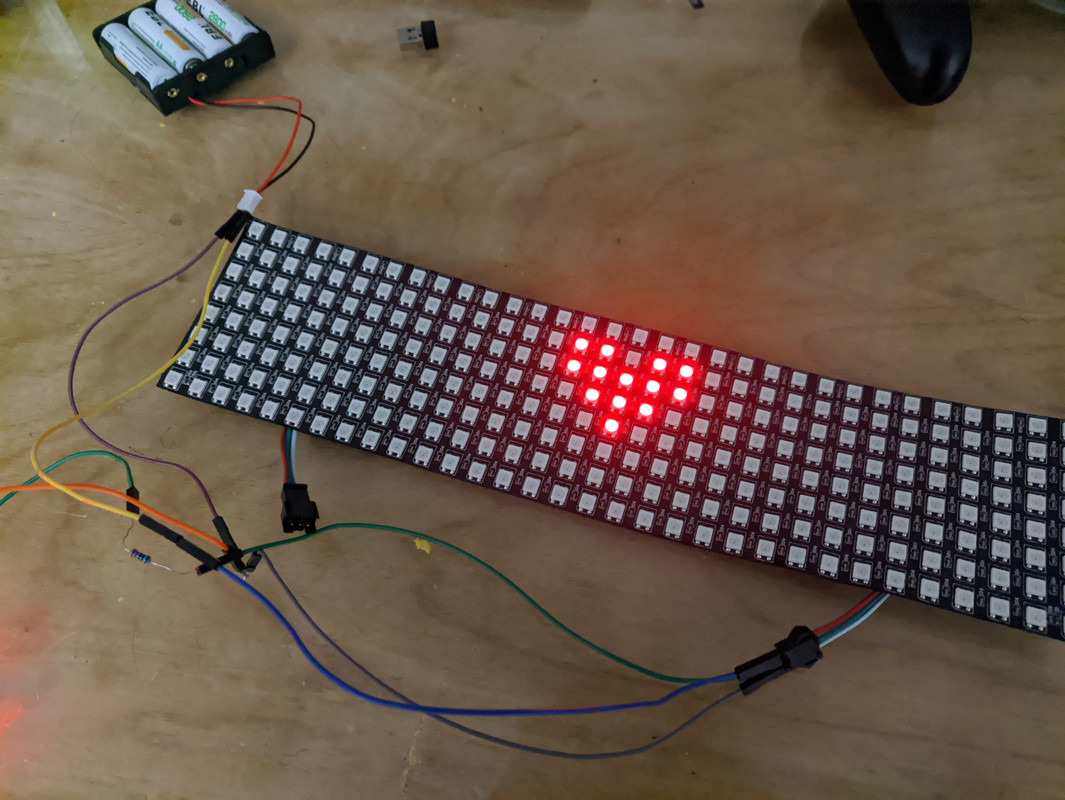
So let's design this heart using an int array:
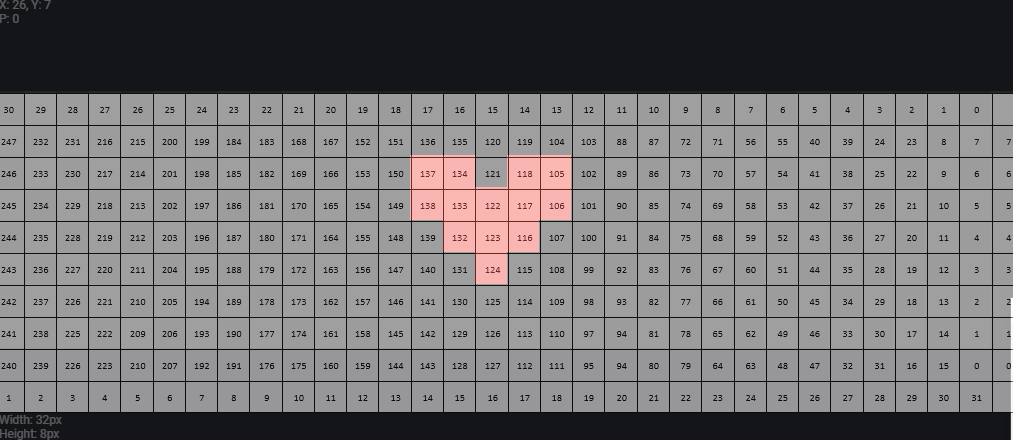
const uint16_t visorHeart[] PROGMEM = {105, 106, 116, 117, 118, 122, 123, 124, 132, 133, 134, 137, 138};
Great. I know this is a lot to swallow, but you're getting there. Next, we need to define the size of this array. Just count how many numbers you put in, and put this line near the top of your file.
#define NAME_MUST_BE_UPPERCASE NUMBER
So, in this case,
#define VISOR_HEART 13
Perfect. We're almost done. Finally, we're going to head back to our main .ino file and put this code in the loop:
FastLED.clear();
drawPattern(intArrayName, SIZE_NAME, hexcode-of-the-colour-you-want);
FastLED.show();
delay(nanoseconds);
Use a hex picker to find the colour and place 0x before it. So, in this case,
FastLED.clear();
drawPattern(visorHeart, VISOR_HEART, 0xFF0000);
FastLED.show();
delay(500);
Upload that code to your Arduino, and with any luck you should see your design come to life. If not, and you're having trouble debugging your code, open an Issue or contact me on Telegram.