This example shows how to implement a fullstack app in TypeScript with Next.js using React (frontend), Next.js API routes and Prisma Client (backend). It also demonstrates how to implement authentication using NextAuth.js. The example uses a SQLite database file with some initial dummy data which you can find at ./prisma/dev.db.
Note that the app uses a mix of server-side rendering with getServerSideProps (SSR) and static site generation with getStaticProps (SSG). When possible, SSG is used to make database queries already at build-time (e.g. when fetching the public feed). Sometimes, the user requesting data needs to be authenticated, so SSR is being used to render data dynamically on the server-side (e.g. when viewing a user's drafts).
Clone this repository:
git clone [email protected]:prisma/prisma-examples.git --depth=1
Install npm dependencies:
cd prisma-examples/typescript/rest-nextjs-api-routes-auth
npm install
Note that this also generates Prisma Client JS into node_modules/@prisma/client via a postinstall hook of the @prisma/client package from your package.json.
In order to get this example to work, you need to configure the GitHub and/or Email authentication providers from NextAuth.js.
Expand to learn how you can configure the GitHub authentication provider
First, log into your GitHub account.
Then, navigate to Settings, then open to Developer Settings, then switch to OAuth Apps.
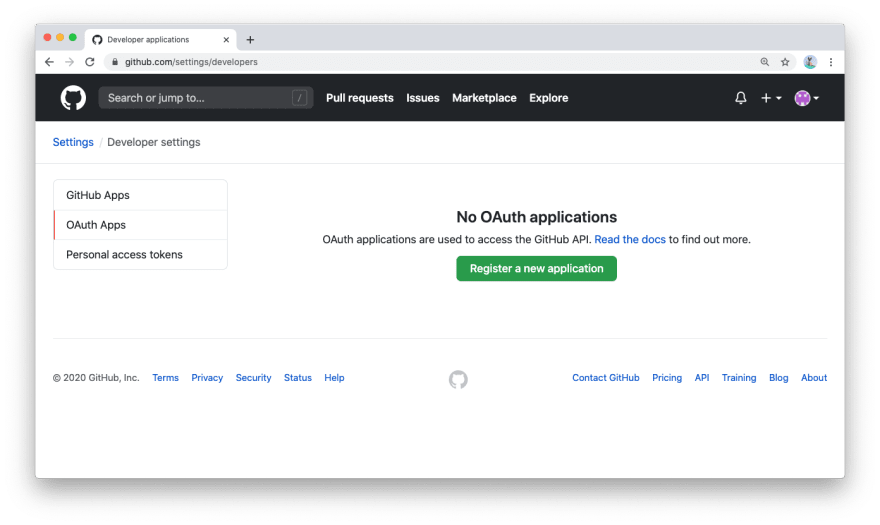
Clicking on the Register a new application button will redirect you to a registration form to fill out some information for your app. The Authorization callback URL should be the Next.js /api/auth route.
An important thing to note here is that the Authorization callback URL field only supports a single URL, unlike e.g. Auth0, which allows you to add additional callback URLs separated with a comma. This means if you want to deploy your app later with a production URL, you will need to set up a new GitHub OAuth app.

Click on the Register application button, and then you will be able to find your newly generated Client ID and Client Secret. Copy and paste this info into the .env file in the root directory.
The resulting section in the .env file might look like this:
# GitHub oAuth
GITHUB_ID=6bafeb321963449bdf51
GITHUB_SECRET=509298c32faa283f28679ad6de6f86b2472e1bff
You can follow the instructions in the NextAuth.js documentation to configure the Email authentication provider. Once your email authentication proivder is configured, you can set the environment variables in .env accordingly.
npm run dev
The app is now running, navigate to http://localhost:3000/ in your browser to explore its UI.
Evolving the application typically requires five subsequent steps:
- Migrating the database schema using SQL
- Updating your Prisma schema by introspecting the database with
prisma introspect - Generating Prisma Client to match the new database schema with
prisma generate - Using the updated Prisma Client in your application code and extending the REST API
- Building new UI features in React
For the following example scenario, assume you want to add a "profile" feature to the app where users can create a profile and write a short bio about themselves.
The first step would be to add a new table, e.g. called Profile, to the database. In SQLite, you can do so by running the following SQL statement:
CREATE TABLE "Profile" (
  "id" INTEGER NOT NULL PRIMARY KEY AUTOINCREMENT,
  "bio" TEXT,
  "user" INTEGER NOT NULL UNIQUE REFERENCES "User"(id) ON DELETE SET NULL
);
To run the SQL statement against the database, you can use the sqlite3 CLI in your terminal, e.g.:
sqlite3 dev.db \
'CREATE TABLE "Profile" (
  "id" INTEGER NOT NULL PRIMARY KEY AUTOINCREMENT,
  "bio" TEXT,
  "user" INTEGER NOT NULL UNIQUE REFERENCES "User"(id) ON DELETE SET NULL
);'
Note that we're adding a unique constraint to the foreign key on user, this means we're expressing a 1:1 relationship between User and Profile, i.e.: "one user has one profile".
While your database now is already aware of the new table, you're not yet able to perform any operations against it using Prisma Client. The next two steps will update the Prisma Client API to include operations against the new Profile table.
The Prisma schema is the foundation for the generated Prisma Client API. Therefore, you first need to make sure the new Profile table is represented in it as well. The easiest way to do so is by introspecting your database:
npx prisma introspect
Note: You're using npx to run Prisma 2 CLI that's listed as a development dependency in
package.json. Alternatively, you can install the CLI globally usingnpm install -g prisma. When using Yarn, you can run:yarn prisma dev.
The introspect command updates your schema.prisma file. It now includes the Profile model and its 1:1 relation to User:
model Post {
  author    User?
  content   String?
  id        Int     @id
  published Boolean @default(false)
  title     String
}

model User {
  email   String   @unique
  id      Int      @id
  name    String?
  posts   Post[]
  profile Profile?
}

model Profile {
  bio  String?
  id   Int     @default(autoincrement()) @id
  user Int     @unique
  User User    @relation(fields: [userId], references: [id])
}With the updated Prisma schema, you can now also update the Prisma Client API with the following command:
npx prisma generate
This command updated the Prisma Client API in node_modules/@prisma/client.
You can now use your PrismaClient instance to perform operations against the new Profile table. Those operations can be used to implement a new route in the REST API, e.g. /api/profile.
Here are some examples for some Prisma Client operations:
const profile = await prisma.profile.create({
    data: {
        bio: 'Hello World',
        user: {
            connect: { email: '[email protected]' }
        }
    }
});const user = await prisma.user.create({
data: {
email: '[email protected]',
name: 'John',
profile: {
create: {
bio: 'Hello World'
}
}
}
});const userWithUpdatedProfile = await prisma.user.update({
where: { email: '[email protected]' },
data: {
profile: {
update: {
bio: 'Hello Friends'
}
}
}
});Once you have added a new endpoint to the API (e.g. /api/profile with /POST, /PUT and GET operations), you can start building a new UI component in React. It could e.g. be called profile.tsx and would be located in the pages directory.
In the application code, you can access the new endpoint via fetch operations and populate the UI with the data you receive from the API calls.
- Check out the Prisma docs
- Share your feedback in the
prisma2channel on the Prisma Slack - Create issues and ask questions on GitHub